Cách tạo form trong google docs

Read Time: 14 mins url-selector#selectionChanged"> العربية/عربي বাংলা English Español Bahasa Indonesia Melayu Pусский українська мова اُردُو Tiếng Việt
There’s so many ways to create online forms, it can be overwhelming to pick the perfect one for your needs. Arguably the most powerful is one you already have access to for free—it"s available inside of Google Drive.
Drive is an integral part of every Google account, and is best known as a cloud storage service and for its Google office suite. One of its lesser known features is Google Forms, a form building tool that is as simple or as complex as you need it to be. Whether you’re collecting email addresses, running snap polls on your website, or are building in-depth customer service surveys or questionnaires, Forms is the ideal tool to use.
Bạn đang xem: Cách tạo form trong google docs
In this tutorial, I"ll show you how to get started with Google Forms. We"ll cover the example of how to make a Google Form survey. I"ll explain the different types of questions you can create with it, how you can make the questions vary depending on the responses the user provides, and finally how you can access and analyse the data you receive. I"ll also provide a short screencast on how to use a survey template. Let’s get started.
How to Make a Survey Quickly With Google Forms (Video)
Study this screencast to learn how to customize a Google Forms survey template quickly, so you can start making and sending out your own surveys with Google Docs:
Or, explore the detailed step-by-step process below for how to make a new survey from scratch using Google Doc Forms.
1. Getting Started With Google Forms
Let"s start with making our Google Doc survey. First, in your web browser, go to drive.google.com and login to your Google account if you haven"t already done so. In the top left corner of the screen click New > More > Google Forms.


Step 1. How to Create Your First Google Forms Survey
Click the arrow to the right of the Google Forms option to choose between opening a blank form or creating a form from a template.


Click Blank form to create a survey from a blank form. Or, click From a template to create a survey from a template. If you find a template you like, then click on it to open the template.


However, the default theme is suitably neutral if you"re planning to embed your survey into your website. To access it, either select the Blank option from the Template gallery or select the Blank form option from the drop-down menu.
Step 2. How to Define Google Forms Settings
You"re now at the main Forms page. You"ll see two tabs at the top of the form. One tab is titled Questions, the other is titled Responses.


You"ll set up formatting independently for Questions and Responses by clicking on each tab.
Once you"ve selected a tab, accessformatting options by clicking the Moreicon (it looks like three vertical dots) in the upper right corner of thescreen. From the drop-down menu, select the Settings icon.


The Settings dialog box appears.


The Settings window has three tabs:
GeneralPresentationQuizzesFor the purposes of this example, I"ll show youhow to change response settings. Click the center tab, Presentation, to display the options there.
If your form is going to be two or more pages long, then tick the box labelled Show progress bar... to show the respondent how long it will take them to fill out the survey.
You can define other survey settingsaccording to your needs by using the Settingsscreen for either the Questions or Responses tab.
To continue with this example, let"sreturn to the Questions tab.
Step 3. How to Name the Google Forms Survey
The Google Forms survey is split into sections, but obviously to begin you"ll only have one section. The title of the form and its description are at the top—click on either to type your own text over them.


Your text replaces the default text. Now you are ready to add your first question.
Step 4. How to Add Your First Google Survey Question
ClickUntitled Question to add your question. Click the More icon (it looks like three vertical dots) in the lower rightcorner and add a Description if the question needs explaining.
The down arrow on the right of thequestion brings up the Question Typedrop-down menu.


A multiple-choice question is set upby default, but there are nine different kinds of input you can request byclicking the down arrow next to the default and bringing up a drop-down menu.
We"lllook at seven of those question types in this tutorial.
2. Types of Question
In this section, we examine seven types of Google Forms survey questionsyou can define. The Question Type drop-downmenu appears below.


Type 1. Short Answer
This question type requests very short text input from the user, such as their name or email address.
To ensure they enter a valid email address click the More icon (it looks like three verticaldots) in the lower right corner of the question. Tick Data validation. Choose Text from the drop-down menu for the first blank and Email address in the second. In the Custom error text blank type "Please enter a valid email address".


Make a question a required question bysliding the toggle button to the right next to the word "Required" in the lower rightcorner. A red asterisk appears next to the question in the survey to show that it isrequired.
Type 2. Paragraph
This type of question requests a longer response, such as for general comments or feedback. Here is an example of a paragraph question.


After you select the question typefrom the drop-down menu on the right, type the question on the left.
Type 3. Multiple Choice
The Google Forms multiple choice type of question provides a list of answers, and the user can select only one. Add your first answer over the label Option 1, then click over the text for the next option to add the second answer and so on. You can also click Add “Other” to add a blank at the end of the list. The user can add their own choice of answer there.


To remove a multiple-choice optionfrom the question, click on the X to the right of the option.
Type 4. Checkboxes
This is another multiple-choice list, only this time the user can select more than one answer. As with the Multiple Choice question, type in your list of answers and use the Other option as well if you need to.
You can specify the minimum, maximum or exact number of answers by using the Data Validation option foundon the drop-down menu of the More iconin the lower right corner of the question.


Type 5. Dropdown
This is a multiple-choice style question presented in the form of a drop-down list. The user can only choose one answer, and cannot add their own choice. It"s good for absolutes, such as age ranges, rather than opinion-based questions.
Xem thêm: Game Cờ Tỷ Phú 360Mobi - 360Mobi Cờ Tỷ Phú Apk 1


Youcan add an Add All option, althoughthis will not make sense for either/or type questions. For privacy"s sake, youcan also add a Prefer not to sayoption, allowing the survey taker to opt out of the question.
Type 6. Linear Scale
Linear Scale asks the respondent to rank things on a scale of, by default, one to five. Youcan expand the scale up to ten and you can elect to start the scale at zeroinstead of one. You should provide labels for the lowest and highest scores on the scale for guidance. An example question might be “How satisfied were you with the service you received?”. The label for a score of 1 would be “Very unsatisfied” and 5 would be “Very satisfied”.
The Linear Scale option lends itself to multiple questions, but you can only add one at a time. Create multiple questions quickly by clicking the Duplicate button atthe bottom of the question (it looks like two sheets of paper), then rewrite the Question Title in the copy.


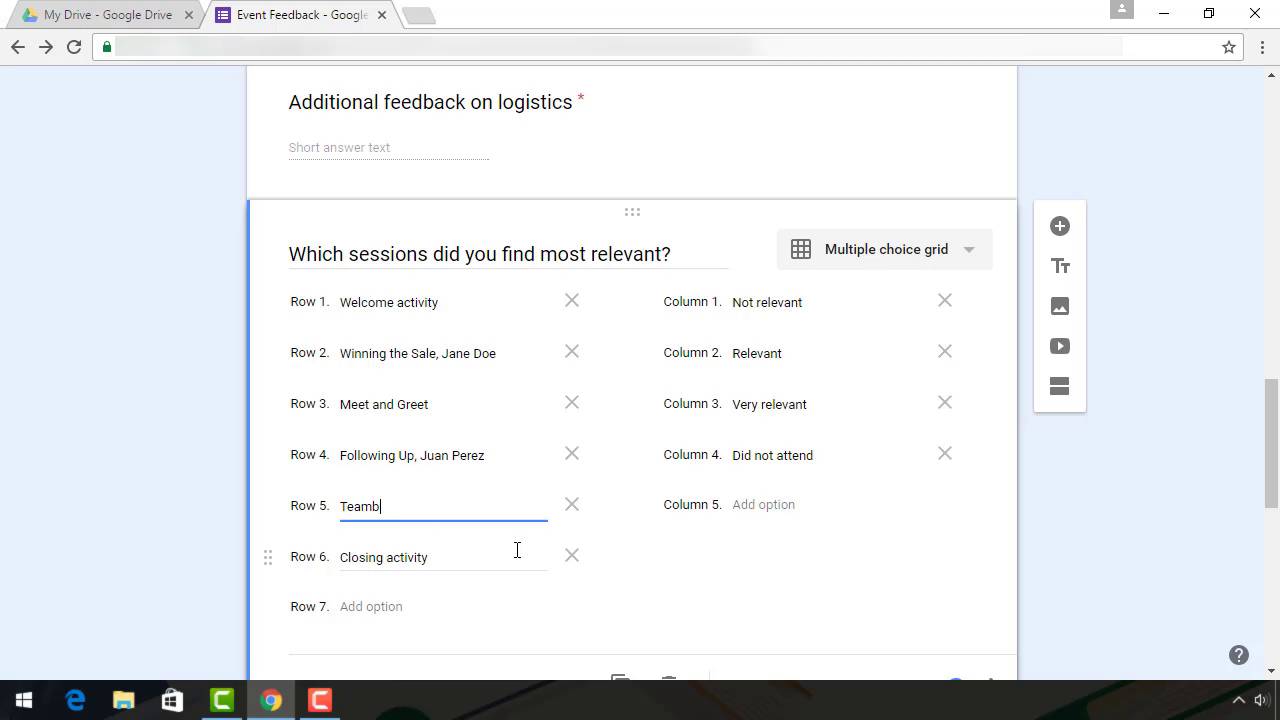
Type 7. Multiple Choice Grid
A multiple-choice grid allows the user to select pre-definedoptions for more than one choice. This can be good if you want the user toevaluate a list of items using the same choices.
Notice that the Required slider text changes from Required to Require a response in each row.


Use the Moredrop-down menu at the bottom of the question to limit the user to one choice for each column.
3. Adding More Questions
When you have finished writing each question click theAdd question icon (+) in the lowerleft corner to add it. Then start another question, choosing the question type from the list.
TheAdd section icon (=) in the lowerright corner enables you to add a new section (Section Header). This helps you organize a longer survey. At the very least it"s a good idea to have personal information questions grouped into their own “About you” section.


4. Creating Dynamic Forms
Section breaks are also useful for building more dynamic surveys that will show different questions based on the user"s replies.
Here"s an example: you"re creating a technology survey asking people about their usage of smartphones and tablets. You can make this as relevant as possible by splitting the questions over three sections.
Section 1 contains the multiple-choice question “Do you own a smartphone?”. Option 1 is Yes; Option 2 is No.
Fromthe More drop-down menu at the lowerright of the question, select the Go to section based on answer option. For option 1, select continue to nextsection. For option 2, select Go tosection 3 (About You).


Section 2 contains your questions about smartphones. Section3 contains About You demographicsquestions.
In this example, if someone answers Yes to the question on section 1 itwill take them to the smartphone questions on section 2, which will in turnlead on to section 3.
If they answer No on section 1, itwill skip the smartphone questions and go straight About You questions on section 3.
This method ensures your surveyremains relevant to the participant, and helps maintain the integrity of thedata you receive in the process.
5. FinishingUp
Re-order your questions and sectionsby hovering your mouse over them and dragging them into place. Click Previewon More drop-down menu at the top of the screen to test the form atany time.


Whenyou"re happy that it all works, edit the Confirmation message that the user willsee when they complete the survey. You can access the Confirmation message from the Moremenu at the top of the screen. Thank the user for taking part and click Save.


Once your survey is complete, you"re now ready to share it. Click the Sendicon in the upper right corner of the screen (it looks like a paper airplane).The Send form displays.
Here are the options you can use todeliver the survey:
To send the survey through email,click the Email icon. Fill out thefields and click Send when you aredone.To deliver the survey via ashareable link, click the Link icon.Click Copy to make a copy of the URL.To put the form on your website,click the Embed HTML icon. Change the Width and Height sothat the form will fit your web page (the width is the most important). Click Copy to copy the code and paste it ontoyour website.To share the survey through socialmedia, click one of the social media icons on the right.Here is an example of the Embed HTML dialog box:


Finally,you want to define how you will store your responses. Click the Responses tab and click the threevertical dots at the top of the screen. The Responses tab displays:


Click Select response destination.The survey data is saved to a spreadsheet, so enter a relevant title then click Create. Google Formscreates a Google Sheets spreadsheet and links it to your survey.
Check also that the Responses tab says Acceptingresponses—if it does your survey is live.
6. Getting Responses
You can check the results at anytime. If you chose to export data to a Google Sheets spreadsheet, open the associated spreadsheet from your Google Drive account.


You may need to tweak the appearanceof the survey data in your Google Sheets spreadsheet.
Google Sheets can also be set up tosend you real-time notifications when a new survey response comes in. Click Tools > Notification Rules. The Set notification rules dialog boxdisplays:


Click the toggle button next to A user submits a form and click Save. You"ll receive a real-time emailnotification each time a user submits a new survey form.
You can also view your responsesfrom within the Google Doc survey. Click the Responses tab. Click Summary to view all the data displayed ineasy to read charts and graphs.


Alternatively, click Individualto see each individual completed survey.
If you"ve saved your survey resultsto a Sheets spreadsheet, you can see the results by going to your Google Driveand finding the spreadsheet associated with the survey.
It"s best not to edit that spreadsheet directly,but you can copy and paste the data into another spreadsheet or other documentfor further analysis. Here"s what your spreadsheet might look like after youformat it.


When you have received enoughresponses you can close the survey down. On the Responses tab, slide the Accepting Responses toggle to theleft and it will change to Not accepting responses. You can add a briefmessage indicating that the survey is now closed, and you can, of course, turnthe form back on at any time.
Conclusion
The Google Forms feature in GoogleDrive is an extremely powerful tool capable of creating the most complexsurveys. It"s also intuitive enough that if you want to run a quick poll orcompetition you can throw one together in just five minutes.
What lifts itabove other survey creation tools is the way it fully integrates with GoogleDocs and the rest of your Google services. This means you can collaborate withothers on creating your surveys, or share the finished product with selectpeople, and then use the power of a spreadsheet to analyze your responses.
Best of all, it is suitable for usein any scenario, just as helpful with powering a vital customer feedback form foryour worldlinks.edu.vn as it is for sending out your wedding invitations. Give it a try, andlet us know in the comments below if you have any trouble with it.
Editorial Note: This post wasoriginally published in 2014. It has been comprehensively revised to makecurrent, accurate, and up to date by our staff—with special assistance from Laura Spencer.


