Hướng dẫn xóa nand thiết bị samsung trong công cụ odin đơn giản nhất

If you own a Samsung Galaxy device, you must have noticed the ‘Nand Erase‘ or ‘Nand Erase all‘ in Odin. So, what does Nand Erase in Odin mean? Should we check this option in Odin while flashing Samsung firmware via Odin tool? What are you supposed to do fix your device in case you mistakenly enable it before installing the firmware? In this Samsung Odin tutorial, I’ll explain the meaning of Odin Nand Erase, the way to install firmware with Nand Erase and Re-Partition options turned on.
Bạn đang xem: Hướng dẫn xóa nand thiết bị samsung trong công cụ odin đơn giản nhất
Odin NAND Erase Explained
So, what does Nand Erase in Odin mean? If you have been into flashing custom ROMs on your Android device, you must be familiar with the term ‘nandroid‘ and ‘nandroid backup‘. The nandroid utility present on custom recoveries like TWRP gives the user an option to create a backup of all partitions and structured directories on a device where the following data are stored.
Universal Android Partitionsbootrecoverykernelsystemdatacache.android_securesd-extOEM-specific Partitionsdatadata (Samsung devices)wimax (Samsung devices)efs (Samsung devices)preload (Samsung devices).cust_backup (Huawei devices)flexrom (Acer devices)mmcblk0_start (Acer devices)custpack (Alcatel devices)mobile_info (Alcatel devices)appslog (HTC and Sony devices)uboot (MTK based devices)So, when you create a nandroid backup through Recovery Mode or standalone scripts, the nandroid utility creates an exact mirror of everything present on your Android device. When you restore the backup, all the partitions are restored to the exact condition they were at the time of backup.
The reason why I listed the partitions on Android devices is to explain the meaning of NAND when it’s mentioned in the context of Samsung devices. When you erase NAND on a Samsung device, you wipe everything including boot, kernel, recovery, system, data, cache, and EFS partitions. When all these things are erased from your device, it’s left with nothing except the Download or Odin Mode and the hardware.
Having performed a NAND Erase, your Samsung Galaxy phone or tablet won’t boot at all. and if you don’t know how to recover your phone or about a “nand erase all fix”, your costly device will become unusable. Below, we’ll see how to install a Samsung firmware with Nand Erase and Re-partition options enabled.
The common practice during flashing a stock Samsung firmware using Odin involves just adding the AP, BL, CP, and CSC or HOME_CSC files to the appropriate fields and hit the Start button. By default, the ‘Auto Reboot‘ and ‘F. Reset Time‘ options are checked by default. You aren’t supposed to play with options like Nand Erase or Nand Erase All, Re-Partition, Flash Lock and Device info at all during a normal firmware flash.
Should You Check Re-Partition in Odin?
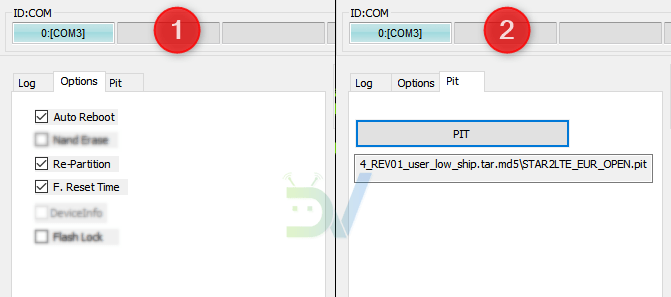
Well, that depends on the situation. As I said above, you don’t need to do that in normal circumstances. Usually, all Samsung firmware have a PIT file inside the CSC file. When you click the PIT tab in Odin, you’ll get the following warning.

Suppose you purchased a 512GB variant of the Galaxy S10. And, after installing a firmware you’re shocked to see that your phone’s storage is reduced to 128GB. It’s because of PIT corruption or flashing the PIT meant for the 128GB model on the 512GB model.
In case your device’s partition table has corrupted because of a bad firmware flash or any other reason, you can fix your Samsung phone or tablet using the Re-Partition option. You should check the Re-Partition option in Odin only if have to flash a PIT (Partition Information Table) file your Samsung. Make sure that you have the correct PIT file.
Moreover, you aren’t supposed to flash only the PIT file. You must flash a PIT along with the 4 firmware binaries, namely AP, BL, CP, and CSC. Also, you must enable Re-Partition in Odin’s PIT tab. In my case, I am flashing a PIT file on my Galaxy S9+.
Installing Firmware with Odin Nand Erase Enabled
If you can flash a Samsung firmware with Odin’s default settings, why would one even want to perform a Nand Erase in Odin? Again, it depends on the situation I’ll say!
Sometimes, your Samsung phone or tablet might refuse to boot up properly after you have installed a firmware. Your Samsung device might get stuck on the Samsung logo and won’t get past it. In many cases, the issue can be fixed by performing a data factory reset via stock recovery. However, in some cases, you might not be able to access the Samsung recovery mode. What would you do then? You can try re-installing the firmware but that may not help you.
I remember a guy who lost the IMEI of his Galaxy S8 because the EFS partition was corrupted. He tried flashing different versions of firmware with no positive results. Then he “nand-earased” his phone, flashed a new firmware and restored the IMEI successfully.
Xem thêm: Truyện Người Đẹp Làm Nhân Chương Mới Nhất, Truyện Người Đẹp Làm Nhân
Whatever the situation may be, if you somehow get into a situation where you got no other option than flashing the firmware with Nand Erase option enabled, you should follow the steps described below.
Now that you’ve made all the preparations and have the required files, boot your device into the Recovery Mode by pressing and holding the following key combinations for 3-5 seconds.Samsung devices with Home button: Volume Up + Home + Power keys.Devices with no Home but Bixby button: Volume Up + Bixby + Power buttons.Devices with no Home or Bixby button: Volume Up + Volume Down + Power keys. Release the Volume Down button as soon as you see the Samsung logo.Samsung Galaxy Tabs: Volume Down + Power keys.When you get into the Recovery Mode, navigate to the ‘Wipe data/factory reset‘ using the Volume Down key and select it using the Power button. Select ‘yes‘ on the next screen. When the device is wiped, select the ‘Power off‘ option.Okay, it’s time to boot your Galaxy phone or tablet device into the Odin Mode or Download Mode. You can use one of the following hardware key combinations to do so. You need to press and hold these buttons for a few seconds. Then press the Volume Up button when prompted.Samsung devices with Home button: Volume Down + Home + Power keys.Devices with no Home but Bixby button: Volume Down + Bixby + Power buttons.Devices with no Home or Bixby button: Volume Up + Volume Down + Power keys.Samsung Galaxy Tabs: Volume Up + Power keys.Unzip the Odin.zip file, open the extracted folder double-click the Odin.exe to launch it.Connect your device to the PC via a USB cable. The ID:COM port on Odin will be highlighted when a successful connection is established.Extract the firmware.zip file and open the firmware folder. If it’s a single-file firmware, click the PDA or AP button in Odin and add the firmware file with .tar.md5 extension to it. If the firmware folder contains 4-5 files, add the BL, AP, CP, and CSC files to the corresponding fields.Now click the Options tab in Odin and check Auto Reboot, Nand Erase and F. Reset Time. Select Re-Partition too if you have the appropriate PIT file. You can add the PIT file using the PIT tab in Odin. Please note that if you want to fix your Samsung device because it stuck on the Samsung logo because you flashed the firmware with Nand Erase enabled, you should not select Nand Erase and Re-Partition while installing the firmware.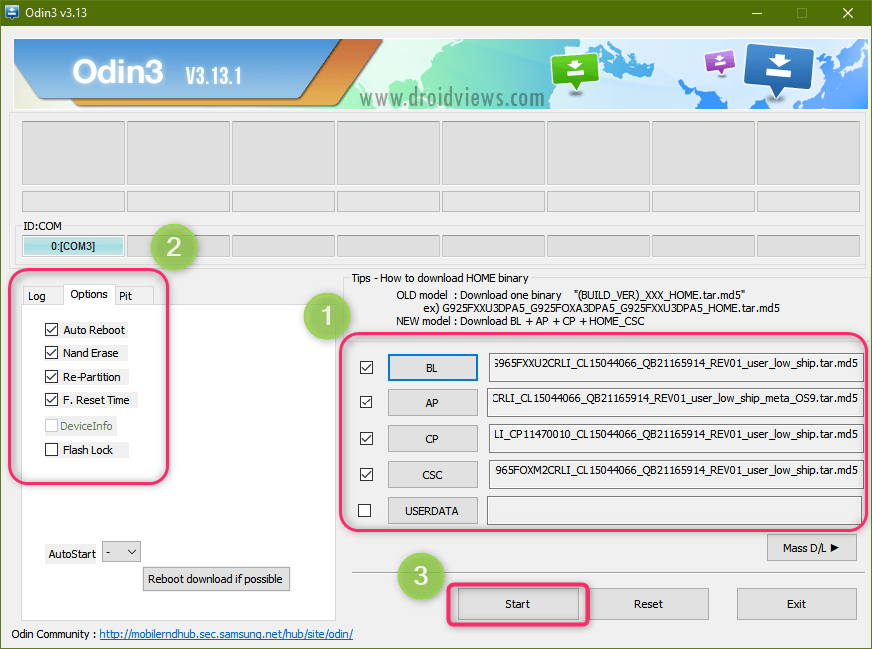
Done! In case things don’t go as expected and your device doesn’t boot up normally, you should perform a data factory reset via stock recovery as describe again. It’s time to wind up my Samsung Odin tutorial written with an aim to help you with fixing Nand Erase issue and flash the firmware with Nand Erase and Re-Partition option turned on in Odin.


